
Proper insulation installation is the systematic sequence of assessment, preparation, material selection, application, and verification that turns a building envelope into an efficient thermal barrier. In Huntsville, AL, this process directly addresses local pain points—seasonal humidity, temperature swings, and moisture-driven mold risks—by reducing energy use and improving indoor comfort. This guide explains each stage of the insulation installation process, outlines the most suitable materials for local conditions, and shows how targeted measures like air sealing and crawl space encapsulation deliver measurable benefits. Readers will learn what to expect during an energy audit, how different insulation methods compare in R-value and moisture performance, typical timelines and disruption levels for attic, wall, and crawl space work, and which cost drivers determine project pricing. Practical checklists and process how-to steps are included to help homeowners and business owners evaluate proposals and plan installations with confidence. After walking through technical details and local recommendations, the guide presents financing options and clearly described warranty and service features offered by local professionals.
Proper insulation installation ensures the building envelope minimizes heat transfer, controls moisture movement, and stabilizes indoor temperatures in a way that preserves indoor air quality and reduces energy consumption. The mechanism is straightforward: correctly installed insulation combined with effective air sealing reduces thermal bridging and uncontrolled ventilation, which lowers HVAC runtime and improves occupant comfort. In Huntsville’s humid subtropical climate, correct installation also prevents condensation and mold growth by aligning thermal and vapor-control layers. The result is lower monthly energy bills, improved indoor humidity control, and a reduced risk of structural or indoor-air-quality problems. Next we will examine how local climate patterns change material choices and target R-values for optimal performance.
Huntsville experiences hot, humid summers and mild winters with frequent humidity swings during shoulder seasons, which increases the importance of moisture control and material selection. High relative humidity elevates the risk of condensation when warm, moist air meets cooler surfaces inside walls or crawl spaces, so materials that resist moisture absorption and paired vapor-control strategies are often recommended. Temperature swings increase the impact of thermal bridging—areas where conductive materials transmit heat—so continuous insulation or closed-cell spray foam that reduces bridging can be advantageous. These climate considerations influence recommended R-values: higher attic R-values for summer heat mitigation and moisture-resistant approaches for below-grade or ground-contact assemblies. Understanding these impacts leads to practical choices about insulation type and installation method for each building area.
Energy-efficient insulation reduces heat transfer, which directly lowers HVAC cycling and monthly energy costs while improving occupant comfort and temperature consistency. Beyond savings, effective insulation paired with air sealing stabilizes indoor humidity, which minimizes mold growth and helps protect finishes and building materials in Huntsville’s humid climate. Additional benefits include reduced noise transmission between rooms and potential positive impacts on equipment longevity because HVAC systems operate less frequently and under less strain. These advantages also influence property value—buyers increasingly expect energy-efficient, moisture-managed homes—which makes proper installation a long-term investment. The next section details the step-by-step process technicians use to achieve these outcomes.
The insulation installation process is a sequence of five core phases: assessment, site preparation (including air sealing), material selection, application, and post-installation inspection and maintenance. Each phase builds on data gathered at the energy audit and addresses site-specific moisture and access challenges, ensuring the thermal solution performs as intended. A well-executed sequence reduces rework and limits homeowner disruption while maximizing long-term performance. Below we break down what to expect during the initial audit, recommended preparation tasks, material-decision criteria, area-specific installation techniques, and final verification steps. Practical timelines and disruption expectations are included to help plan the project.
An initial assessment typically combines visual inspection, blower door testing, and thermal imaging to measure air infiltration, identify thermal leaks, and estimate existing insulation R-values. Practitioners use blower door results to quantify uncontrolled air changes per hour and thermal imaging to locate gaps, compressed insulation, and thermal bridges. The audit also checks for moisture sources, pest activity, and structural conditions that may require remediation before insulation work begins. From these data, a prioritized scope is created that aligns recommended materials and air-sealing measures with measured performance goals. Knowing the audit scope helps homeowners prepare questions and choose the right solution.
Preparation for installation focuses on ensuring access, addressing moisture or pest sources, and protecting HVAC, electrical, and plumbing elements from dust or overspray. Homeowner tasks commonly include clearing storage from attics, providing clear access to crawl spaces or basements, and resolving active leaks or standing water. Contractors typically isolate HVAC vents, mask electrical fixtures, and temporarily move sensitive equipment away from work zones to reduce risk and speed cleanup. Completing these actions minimizes delays and reduces the chance of post-install rework. Proper preparation naturally connects to air-sealing measures that further improve insulation effectiveness.
Air sealing is the targeted closure of gaps, penetrations, and bypasses in the thermal envelope that would otherwise allow conditioned air to escape and humid outdoor air to enter. Common leak points include attic top plates, recessed lights, plumbing and electrical penetrations, and rim joists; sealing these locations can significantly reduce energy loss. By reducing convective heat transfer, air sealing increases the effective R-value of installed insulation and prevents moisture-laden air from condensing within assemblies. Typical methods include caulking, foam gaskets, and spray foam at irregular gaps, and these steps should be completed before insulation is installed. Effective air sealing leads directly to better material performance and longer-lasting results.
Material selection balances R-value per inch, moisture resistance, installation area, budget, and long-term durability to meet Huntsville’s climate demands and project goals. Closed-cell spray foam offers high R-value and acts as a vapor retarder, which can be ideal for below-grade or tight-assembly applications, while open-cell spray foam provides air-sealing benefits at lower cost but with different moisture behavior. Fiberglass and cellulose remain cost-effective for attics and some wall cavities but require careful moisture management to avoid reduced thermal performance. Selection should stem from the audit’s findings—areas with high humidity or limited access often favor spray foam solutions. The next subsection describes how installation differs by building area and what timelines to expect.
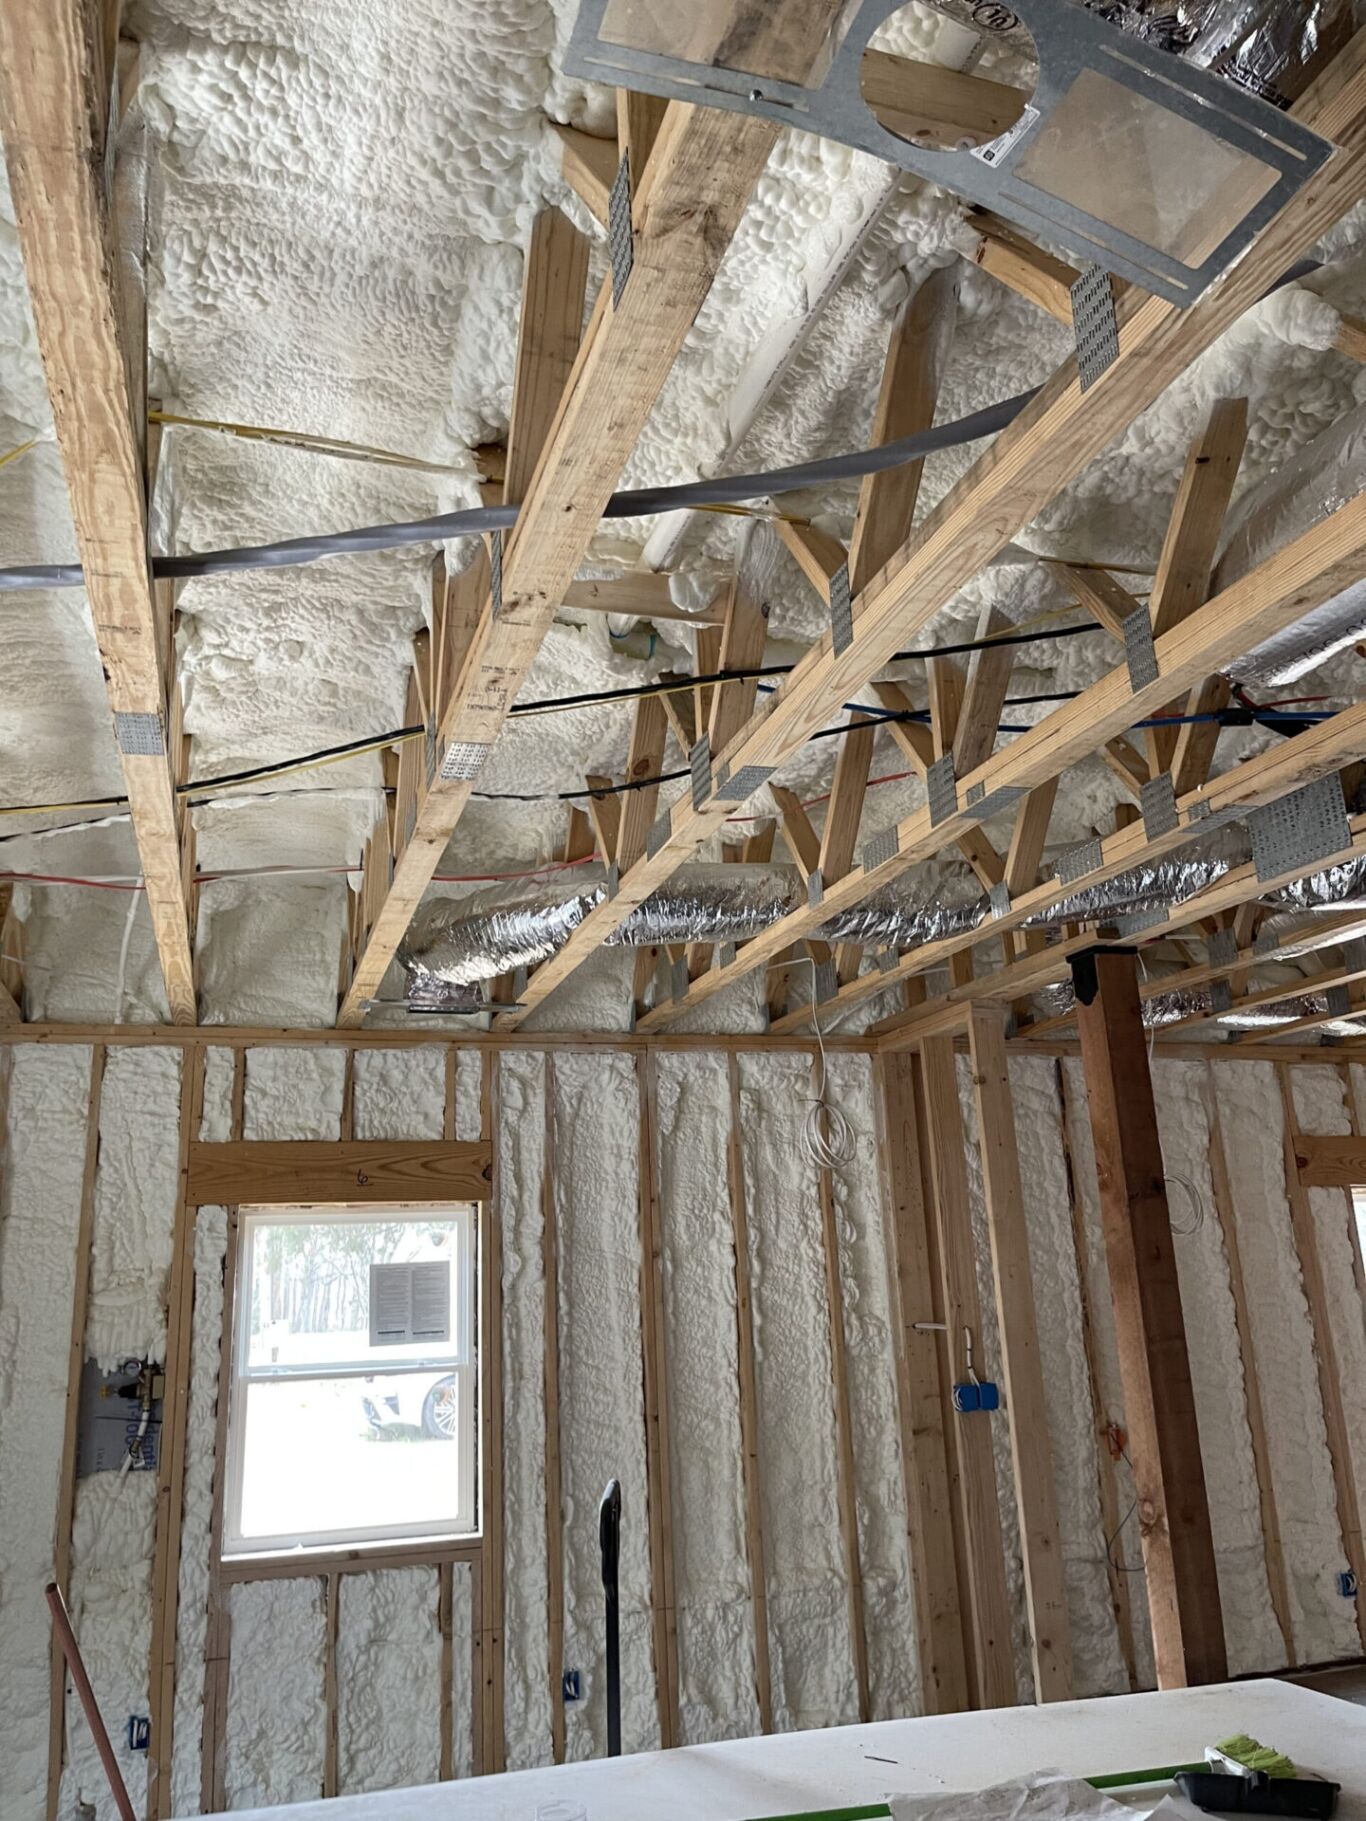
Installation techniques vary by area: attics typically combine air sealing on the attic floor with insulation on the attic plane, walls may require dense-pack cellulose or spray foam through drilled holes, and crawl spaces often use encapsulation with vapor barriers and perimeter insulation. Access, existing construction, and the need for removal of existing insulation determine the method and time required. Work in attics can often be completed in a day for a typical single-family home, while crawl space encapsulation may take several days depending on cleanup and moisture mitigation needs. Managing homeowner expectations on disruption and timeline is essential to a smooth project. These area-specific methods inform the step-by-step spray foam workflow described next.
Spray foam installation begins with site preparation and masking, followed by sequential passes of foam applied to achieve target thickness, curing, trimming, and cleanup to reveal a sealed assembly. Technicians protect mechanicals and ventilation, control temperature and humidity during application, and monitor layer thickness to meet specified R-value and density. Curing time varies by product and conditions but typically allows for re-entry after initial set and full stabilization within 24 hours for many formulations. Post-installation inspection checks for voids, adhesion, and the quality of the air-seal; any trimming or touch-ups follow before the final walkthrough. Proper application minimizes off-gassing risks and ensures the material performs as an integrated part of the enclosure.
Attics are often insulated either at the attic floor (to keep conditioned space below) or along the roof deck (to create conditioned attic space), with air sealing prioritized in both approaches. Wall cavity strategies include cavity-fill techniques—dense-pack cellulose or injected foam—or full-depth spray applications for new construction; access and finish preservation drive the choice. Crawl spaces benefit from encapsulation: installing a continuous vapor barrier on the floor and walls, sealing vents, insulating rim joists, and optionally conditioning the space with a dehumidifier. Each approach has trade-offs in cost, disruption, and long-term performance; understanding these trade-offs helps select the most appropriate method for a particular building. After installation, inspection and maintenance ensure long-term performance.
After installation, a final inspection verifies coverage, adhesion, and the effectiveness of air-sealing and vapor-control strategies using visual checks and, when applicable, blower-door or thermal re-tests. Routine maintenance focuses on keeping vents clear (when applicable), monitoring humidity in basements or crawl spaces, and checking for signs of moisture or pest intrusion that could affect performance. Performance monitoring—such as comparing pre- and post-install energy use or tracking humidity—helps quantify benefits and identify remediation needs. Many professional installations include warranty coverage that protects against material or workmanship defects; for example, some spray foam warranties may be offered as lifetime coverage depending on the installer’s terms. Regular inspections and following maintenance guidance help preserve insulation value and building health.
Choosing the right insulation material in Huntsville requires weighing R-value per inch, moisture performance, air-sealing capability, and cost over the expected lifecycle. Materials that combine good thermal resistance with resistance to moisture absorption and air movement often perform better here, especially in ground-contact or unvented assemblies. Concise pros and cons make it easier to match material to area and budget.
Spray foam generally offers higher R-value per inch and inherent air-sealing that fiberglass and cellulose cannot provide without additional measures. Closed-cell spray foam adds moisture resistance and structural rigidity, which is beneficial for rim joists and some below-grade conditions, while open-cell foam provides excellent air-sealing at lower density but is less moisture-resistant. Fiberglass and cellulose are cost-effective for large attic areas but require careful air sealing and moisture management to avoid performance loss over time. Lifecycle cost analysis often shows spray foam reducing HVAC runtime and maintenance, offsetting higher upfront expense in moisture-prone climates like Huntsville. Understanding these trade-offs helps choose the right solution for each assembly.
Crawl space encapsulation is the process of isolating the crawl space from ground and exterior moisture by installing a continuous vapor barrier, sealing vents and penetrations, insulating walls and rim joists, and optionally adding conditioning or dehumidification. The mechanism stops ground moisture and humid outdoor air from entering the subfloor cavity, which reduces mold risk and prevents wood rot and HVAC performance impacts. For Huntsville’s humid climate, encapsulation stabilizes relative humidity beneath the building and protects floor systems and ductwork often located in crawl spaces. Expected outcomes include lower indoor humidity, reduced allergen and mold risk, and improved HVAC efficiency when ducts are contained within the conditioned envelope. The following subsections outline the steps and local effectiveness.
Encapsulation begins with inspection and moisture mitigation, such as addressing standing water or grading issues, then proceeds to installing a durable vapor barrier on the ground and up the walls, sealing vents and penetrations, and insulating rim joists. Additional steps include sealing plumbing and electrical penetrations, applying spray foam at irregular joints, and setting up monitoring or dehumidification to keep relative humidity within recommended levels. Contractors may recommend addressing exterior drainage problems before encapsulation to reduce long-term maintenance. After installation, periodic checks ensure the barrier remains intact and humidity levels stay controlled. These steps directly reduce conditions that foster mold growth and structural decay.
Encapsulation prevents moisture intrusion by creating a continuous barrier between the ground and interior airspace, blocking capillary moisture and reducing vapor diffusion into the crawl space. Sealed vents and controlled ventilation prevent humid outdoor air from cycling under the floor, so relative humidity stabilizes at levels less conducive to mold. In Huntsville, where outdoor humidity is high for much of the year, this approach reduces the condensation cycles that often lead to biological growth on wood and insulation materials. When combined with active moisture control (dehumidifiers or conditioned ventilation), encapsulation reliably lowers mold risk and protects indoor air quality. The next section reviews cost factors and financing options to help plan encapsulation and other insulation upgrades.
Insulation installation cost varies by material, area, accessibility, removal needs, and remediation required, with typical ranges influenced by local labor and material prices. Key cost drivers include square footage, whether existing insulation must be removed, the complexity of air sealing or structural repairs, and whether specialized products (like closed-cell foam) are chosen. Financing and discount options can reduce upfront cost for homeowners and business owners. Understanding available offers helps owners compare bids and select the most cost-effective long-term solution.
Major cost factors include the square footage to be insulated, chosen material (spray foam versus fiberglass), required removal of old insulation, the complexity of air-sealing work, and any moisture remediation or structural repairs required before insulation. Access issues—such as finished walls, limited attic access, or obstructed crawl spaces—increase labor time and therefore cost. Project timeline constraints and the need for specialized equipment (for spray foam or encapsulation) also add to pricing. Owners should request itemized proposals showing material, labor, air sealing, and remediation line items to compare value rather than only headline prices. Clear breakdowns make it easier to assess long-term return on investment and warranties.
Tennessee Valley Spray Foam LLC provides flexible financing options through Wisetack and Jobber to help spread installation costs over time, making higher-performance materials more accessible. The company also offers a 5% discount for active military, combat veterans, first responders, and nurses as a straightforward reduction in project price for eligible individuals. These financing partners and the targeted discount are factual options homeowners can ask about during the estimate process to reduce upfront expenditure. Contacting the provider to confirm qualification criteria and monthly payment examples helps homeowners compare net costs when evaluating proposals. Transparent financing information reduces friction in decision-making and allows owners to match payments to expected energy savings.
Tennessee Valley Spray Foam LLC is a local insulation contractor focused on improving energy efficiency, comfort, and moisture control for homeowners and business owners in Huntsville. The company emphasizes integrity and quality workmanship, provides free estimates, and supports customers with financing options to lower upfront barriers. Their spray foam offerings come with a lifetime warranty on spray foam (as stated), which can add long-term protection for critical thermal and moisture-control assemblies. For readers wanting a clear, protected path to installation, requesting a free estimate and discussing the financing and discount options gives a practical next step. Below are concise reasons to consider this provider alongside topic-based considerations already covered.
To request a free estimate, prepare basic property information (square footage, areas of concern—attic, walls, crawl space—age of home, and any known moisture or pest issues) and schedule an initial assessment that typically includes a visual inspection and discussion of goals. During the estimate visit, expect technicians to describe the audit process, outline recommended materials and air-sealing measures, and explain financing and discount options available through Wisetack and Jobber. Estimates should include an itemized proposal, timeline expectations, and warranty details so homeowners can compare alternatives objectively. Scheduling typically begins with the audit and, once scope is agreed, moves to a mutually arranged installation window adapted to remediation needs and material lead times.
Insulation projects improve comfort, reduce energy use, and address moisture risks when executed with appropriate local knowledge and proper sequencing. For Huntsville homeowners and business owners, focusing on moisture control, effective air sealing, and the right material choices—paired with transparent cost and financing options—delivers the best long-term results.
Investing in proper insulation installation in Huntsville not only enhances energy efficiency but also significantly improves indoor comfort and moisture control. By understanding the local climate and selecting the right materials, homeowners can achieve long-term savings and protect their property from moisture-related issues. Take the next step towards a more comfortable and energy-efficient home by requesting a free estimate today. Explore your options with Tennessee Valley Spray Foam LLC to ensure your insulation project meets your specific needs.
Address: Huntsville, AL 35802
Phone: (256) 932-3458
Business Hours:
Mon - Sat: 7:00 AM to 5:00 PM
Sun: Closed
Huntsville, AL • Madison, AL • Guntersville, AL • Scottsboro, AL • Decatur, AL • Hazel Green, AL • Fayetteville, TN • Meridianville, AL • Mt Carmel, AL • Priceville, AL • Mooresville, AL • Athens, AL • Woodville, AL • New Market, AL • Gurley, AL • Hartselle, AL • Arab, AL • Albertville, AL • New Hope, AL • Grant, AL
Jobber Financing
5% Discount for Active Military/Combat Veterans, First Responders, and Nurses
Lifetime Warranty on Spray Foam
