
Damp basements pose a persistent challenge for homeowners because moisture undermines insulation performance, invites mold growth, and drives energy waste. This article explains why moisture control must come first, then outlines moisture-resistant insulation choices—like closed-cell spray foam and rigid foam board—that perform well on concrete walls and in humid climates. Readers will learn how common sources of basement and crawl space humidity operate, how targeted remediation improves insulation longevity, and which installation best practices minimize condensation and thermal bridging. The guide also compares insulation materials by R-value, moisture resistance, and air-sealing properties, and it explains how crawl space encapsulation integrates vapor barriers, insulation, and dehumidification to deliver measurable IAQ and energy benefits. Throughout, technical recommendations for Alabama climates are tied to practical steps homeowners can take or request from professionals.
Dampness in basements and crawl spaces occurs when liquid water or persistent humidity overwhelms the building envelope, creating conditions that degrade materials and lower indoor air quality. Groundwater pressure, poor site grading, plumbing leaks, and air infiltration all introduce moisture, while warm indoor air contacting cool concrete leads to condensation on walls and rim joists. In Alabama, seasonal rainfall patterns and high summertime humidity elevate the baseline vapor pressure near foundations, making moisture management especially important. Identifying the root cause—intrusion versus condensation—is the first step to selecting the right remediation and insulation strategy.
Basement and crawl space humidity commonly originates from external and internal sources that act through different mechanisms and therefore require different fixes. Exterior water intrusion arises from poor grading, clogged gutters, and hydrostatic pressure pushing groundwater through walls or floors. Interior sources include plumbing leaks, high indoor humidity from laundry or unvented combustion appliances, and warm air condensing on cool surfaces. Distinguishing intrusion from condensation is critical: look for localized damp streaks and efflorescence for intrusion, and diffuse surface sweating or seasonal timing for condensation. Understanding the source guides whether exterior drainage, interior drains, or dehumidification will be the primary control. Specifically, common sources include exterior water entry where soil saturation and hydrostatic pressure push moisture through joints and cracks; plumbing or appliance leaks causing localized wet spots, pooling, or persistent damp patches near fixtures; condensation from warm, humid indoor air contacting cooler concrete surfaces producing surface moisture; and poor ventilation combined with high ground humidity leading to elevated baseline moisture and increased vapor drive through walls. This helps homeowners triage symptoms and decide whether immediate repairs, drainage, or dehumidification are appropriate before insulation work begins.
Moisture provides the environmental condition mold needs to colonize surface and hidden substrates, and mold growth degrades indoor air quality by releasing spores and microbial volatile organic compounds. When concrete walls or cellulose-based insulation stay above typical equilibrium moisture content, mold can establish within days, accelerating material decay and creating health risks such as allergic reactions and respiratory irritation for occupants. Controlling relative humidity and eliminating liquid water sources reduces mold fuel and interrupts the growth cycle, which in turn preserves insulation performance and contributes to healthier indoor air. Addressing moisture proactively therefore serves both structural and occupant-health objectives.
Moisture remediation improves insulation performance by eliminating liquid water, reducing relative humidity, and stabilizing substrate conditions so insulation materials can function at their rated R-values. Effective remediation prevents insulation compression and microbial degradation, ensures that air-sealing strategies remain intact, and extends the lifespan of both insulation and finishing materials. A practical three-step remediation checklist helps prioritize actions and prepare the space for insulation installation, which includes inspecting and stopping water intrusion by repairing grading, gutters, and foundation cracks; managing subsurface water by installing interior drains or exterior drainage where needed; and controlling humidity and air movement by installing dehumidification and sealing air leaks to reduce condensation. Implementing these steps before insulating prevents common failures such as trapped moisture behind rigid boards or batts and avoids creating habitats for mold. Next, we examine specific waterproofing and crawl space systems that are commonly used to deliver these remediation steps.
Basement waterproofing generally follows two complementary paths—exterior and interior—and choosing the right method depends on the source and severity of moisture. Exterior waterproofing addresses water before it reaches the foundation by improving grading, extending downspouts, and applying exterior membranes, which is most effective for persistent hydrostatic problems. Interior solutions—such as perimeter drains, sump pumps, and vapor-control coatings—manage water that has already entered and are often less disruptive while still effective when combined with proper drainage. Integrating waterproofing with insulation requires sequencing to ensure wall surfaces are dry and stable; for example, rigid foam can be mounted to prepared concrete once drainage and drying are confirmed.
Crawl space drainage and dehumidification reduce bulk moisture and maintain relative humidity at levels that protect insulation and building materials. Drainage systems, including interior channeling to a sump, redirect groundwater away from the space, while encapsulation membranes and sealed seams reduce vapor entry from the soil. Mechanical dehumidifiers, including industry-recognized units, control airborne moisture and keep relative humidity below thresholds that support mold growth. Proper sizing of a dehumidifier is based on crawl space volume, local humidity patterns, and expected moisture loads; routine maintenance of pumps and filters ensures long-term reliability. Together, drainage and dehumidification stabilize the environment so insulation performs as intended.
When selecting insulation for damp basement walls, prioritize materials that resist moisture, provide air sealing, and deliver a reliable R-value on concrete substrates. The top options are closed-cell spray foam and rigid foam board (XPS, EPS, or polyiso), because they offer a combination of vapor resistance, insulation value, and compatibility with foundation walls. Fiberglass batts and mineral wool are generally less suitable where persistent moisture or liquid water is present because they can retain water or lose effective R-value when wet.
Closed-cell spray foam combines high per-inch R-value with structural adhesion and a low-permeance barrier, which limits vapor diffusion and reduces air leakage through joints and cracks. Because it adheres directly to concrete, it eliminates many gaps that otherwise allow warm, humid air to contact cold surfaces, thereby reducing condensation. The material’s closed-cell structure resists bulk water absorption, making it a strong option where intermittent dampness or minor intrusion has been remediated. For homeowners seeking a turnkey solution, professional application ensures correct thickness, continuous coverage, and compliance with local codes—important considerations for long-term performance.
Rigid foam boards—available as extruded polystyrene (XPS), expanded polystyrene (EPS), and polyisocyanurate (polyiso)—offer dimensional stability and steady thermal performance when installed correctly. XPS typically provides higher moisture resistance and steady R-value on concrete walls, EPS is cost-effective with lower initial R-value, and polyiso can offer high R-value per inch but may require careful detailing in cold conditions. Installation best practices include mechanically fastening boards, sealing seams with compatible tape or spray foam, and terminating insulation above grade or at a proper cap to prevent water bridging. Combining rigid boards with a sealed interior drainage strategy and a vapor-control approach yields reliable thermal performance in damp basements.
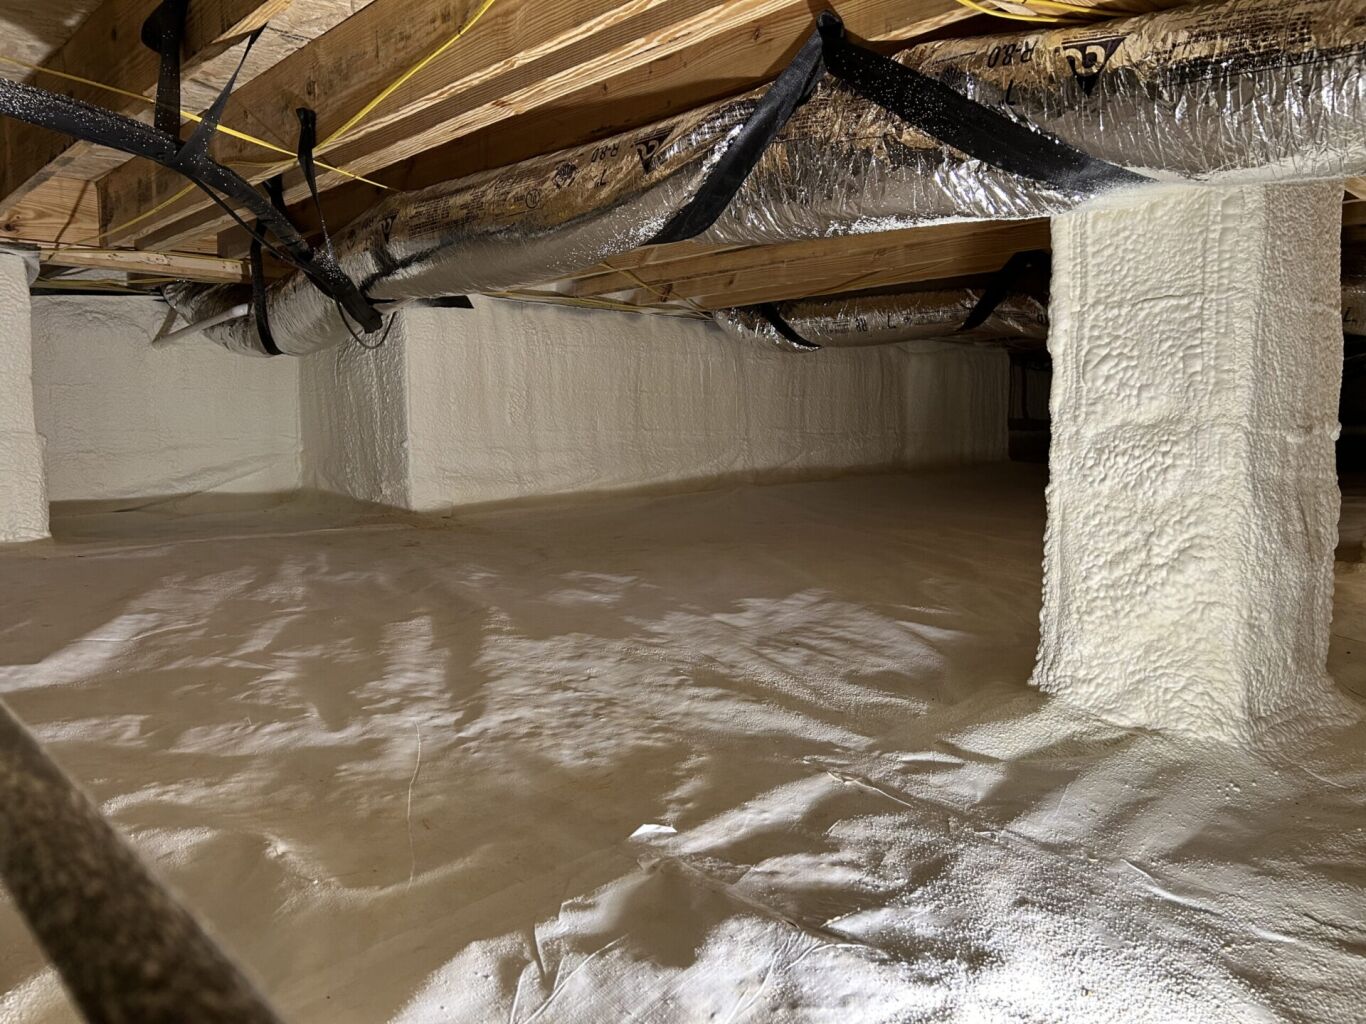
Crawl space encapsulation is an integrated system that combines a continuous vapor barrier, air sealing, insulation of rim joists or walls, and dehumidification to transform a moisture-prone space into a conditioned, stable environment. This approach treats the crawl space as part of the building’s thermal envelope, preventing soil moisture and humid outdoor air from undermining insulation and structural elements. Encapsulation also simplifies HVAC load calculations and can reduce energy transfer through floors, while providing a cleaner air pathway that benefits indoor air quality.
Vapor barriers for encapsulation should be continuous, sealed at seams, and attached to foundation walls or footings to block capillary moisture from the soil. Thickness choices—commonly 6, 10, or 20 mil—affect durability and puncture resistance; heavier membranes offer longer service life in trafficked crawl spaces. Insulation is placed either against the conditioned floor above or on the crawl space walls and rim joists, depending on whether the goal is to condition the crawl space or simply protect the structure. Proper integration means sealing mechanical penetrations, insulating rim joists, and coordinating the membrane terminations with drainage components to prevent unintended water capture.
Encapsulation reduces heat loss through the floor by removing the cold, humid air layer beneath the house and providing continuous insulation at the building edge, which often yields measurable energy savings. It also lowers the risk of mold by eliminating the persistent moisture source and maintaining relative humidity within safe ranges using dehumidification. Case studies and industry guidance indicate that conditioned crawl spaces can improve HVAC efficiency and reduce allergy triggers in the living spaces above. The long-term value includes fewer moisture-related repairs, reduced HVAC cycling, and improved occupant comfort.
Further research highlights the significant energy savings achievable by properly insulating and sealing crawl space vents.
Best practices for insulating damp basements emphasize preparation, sequencing, and material compatibility so that insulation performs at its rated R-value while avoiding trapped moisture. Proper installation starts with surface repairs, targeted waterproofing, and air-sealing of rim joists and penetrations; it continues with selecting a moisture-appropriate insulation system and using vapor control strategies to prevent condensation. Following a concise numbered procedure helps homeowners and installers reduce common errors and ensure durable thermal performance, which includes repairing and drying the substrate by fixing cracks, correcting grading, and ensuring perimeter drainage; air-sealing critical junctions like rim joists, penetrations, and wall-to-slab interfaces before insulating; choosing a moisture-tolerant material such as closed-cell spray foam or sealed rigid foam; installing vapor control appropriately by placing membrane or sealed insulation where it stops vapor drive; and verifying humidity control by adding dehumidification if persistent humidity remains after repairs. This stepwise approach reduces installation defects and prepares the basement for a successful insulation application, which we break down further in the subsections below.
Surface preparation begins with cleaning, repairing cracks and spalls, and confirming that water intrusion has been resolved or managed by drainage systems; insulating over active leaks traps moisture and accelerates material failure. Sealing air leaks at rim joists, service penetrations, and wall-floor junctions reduces convective moisture movement that causes condensation and lowers effective R-values. Recommended materials for sealing include closed-cell spray foam at rim joists and compatible sealants at small penetrations; these measures create a stable substrate for attaching rigid boards or applying finished foam.
Completing these preparations sets the stage for insulation that remains dry and effective over time.
Correct vapor barrier placement depends on material choice and climate: on many concrete walls, exterior drainage plus an interior sealed insulation layer is preferable to relying solely on an interior vapor retarder on the warm side. Common DIY mistakes include leaving seams unsealed, using undersized membranes, or installing insulation before confirming that water intrusion has stopped. Professionals bring coordinated sequencing, tools for continuous sealing, and workmanship that reduce risk and potential rework. For complex moisture histories or when encapsulation and dehumidification are required, professional installation ensures system compatibility and long-term performance.
Hiring a professional for damp basement insulation brings specialized knowledge of moisture control, material selection, and code-compliant installation—factors that significantly affect long-term outcomes. Professionals evaluate root causes, specify integrated remediation and insulation sequences, and provide workmanship guarantees that protect homeowners from premature failures. For residents of Alabama, local expertise is particularly valuable because professionals understand regional precipitation patterns, soil conditions, and common foundation types found in the area.
Costs for basement insulation vary primarily with material choice, accessibility, remediation needs, and labor intensity; projects that require drainage, structural repairs, or comprehensive encapsulation will naturally be larger investments than spot treatments. Other drivers include the need for professional-grade dehumidification, the chosen insulation system (spray foam versus rigid board), and the complexity of sealing penetrations. Because many variables affect price, reputable providers offer free estimates and transparent proposals that list material and labor components so homeowners can compare options. For Alabama homeowners, local providers can also advise on incentives or discounts to reduce out-of-pocket cost. When considering costs, homeowners should understand the scope of service and whether remediation is included, note that hard-to-reach spaces increase labor time and cost, and recognize that material choices like closed-cell spray foam usually cost more but reduce future moisture risks. It is always advisable to schedule a free estimate and ask the provider to inspect moisture sources and propose a sequenced remediation plan. This final set of practical steps helps homeowners convert the information in this guide into a vetted plan tailored to their property and budget.
Address: Huntsville, AL 35802
Phone: (256) 932-3458
Business Hours:
Mon - Sat: 7:00 AM to 5:00 PM
Sun: Closed
Huntsville, AL • Madison, AL • Guntersville, AL • Scottsboro, AL • Decatur, AL • Hazel Green, AL • Fayetteville, TN • Meridianville, AL • Mt Carmel, AL • Priceville, AL • Mooresville, AL • Athens, AL • Woodville, AL • New Market, AL • Gurley, AL • Hartselle, AL • Arab, AL • Albertville, AL • New Hope, AL • Grant, AL
Jobber Financing
5% Discount for Active Military/Combat Veterans, First Responders, and Nurses
Lifetime Warranty on Spray Foam
